Posts tonen met het label ECF. Alle posts tonen

woensdag 9 juni 2010

Helios Bloghaton: Fun with Eclipse Remote Services - 1

In many hotels there is no 13th floor, let alone a room with number 13. Everyone knows that there are 13 steps leading up to the gallows and if you suffer from friggatriskaidekaphobia then you don't like Friday the 13th.

Nevertheless, the OSGi Alliance decided to assign number 13 to the Remote Services chapter. This is particularly creepy since the book starts with Chapter 1 and then jumps straight to chapter 13. After chapter 13 the next one is numbered 101. It is as if the Alliance almost wanted to proof that superstition is just that.


Eclipse Remote Services Implementation
And the proof sticks because Chapter 13 is a great chapter. ECF has implemented the remote services specification in February with the 3.2 release of ECF. Remote services come in two parts Discovery [1] and Distribution [2]. This article is about remote services in combination with the new Zookeeper based discovery provider.


To the fun
We have created a few Example projects to show you how remote services work and the user interface of this one is depicted above. It uses a cool new SWT Widget which I have named the OSGilloscope (watch out for a separate blog on this subject.) The other part of the UI consists of a tabbed folder. On one page a new quote is displayed every 15 seconds by a discovered remote service, and on the other page there is information about this remote service.

Get the sources
Please fire up a Helios with a new workspace and get the two bundles needed for this example from this project set** (copy this file in a project, give it the extension .psf, right click and choose Import Project Set...).

** Our recent move of non-epl code to github has rendered the psf file unusable for the org.eclipse.ecf.services.quotes project. Please get these projects from github and import it using "File/Import../Existing projects into workspace" and then point to the archive.

If this is a fresh Helios then you also have to download the ECF components. Point your p2 to http://download.eclipse.org/releases/helios and get the Communication Framework extensions from the EclipseRT project.

Run it
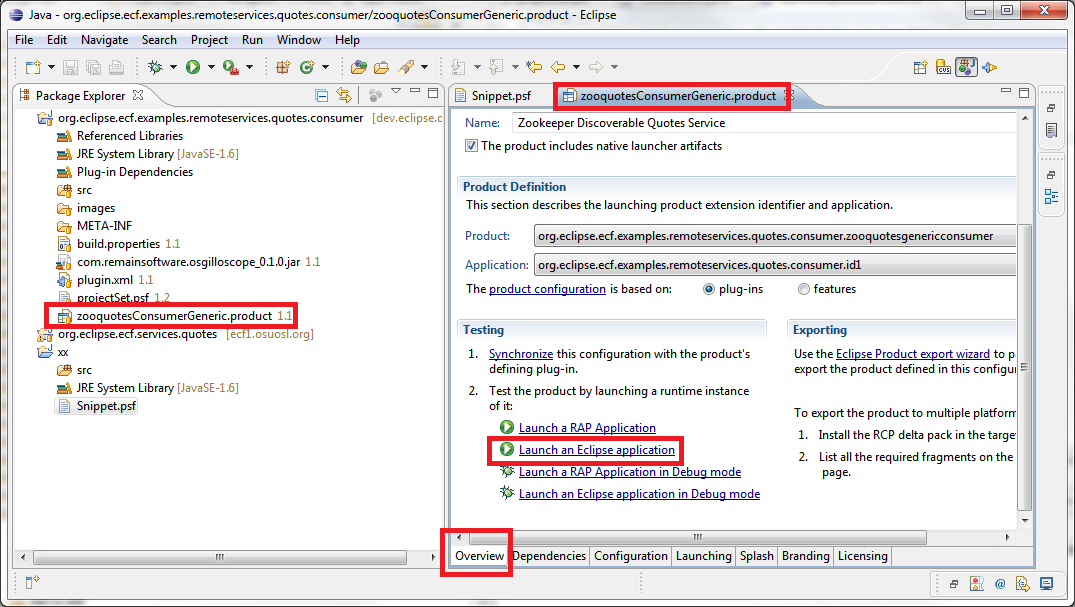
Inside the consumer bundle there is a file ending with .product. Open it and click on the link "launch an Eclipse application".

Yazafatutu.com
My server is named after somebody I once met in a dream. A long and strange story which I will tell you for a beer at Eclipse Summit Europe. This server is hosting the other side of this example and it uses ECF Zoodiscovery which in turn uses Apache Zookeeper from the Hadoop project. Zookeeper servers can be grouped to form a network of continuously synchronizing servers. Zookeeper is designed to replicate configuration data and it does that very fast and very reliable.

At Yazafatutu.com I have started an OSGi container and in there the ECF remote services and Zoodiscovery are running. Zoodiscovery is configured to run in StandAlone mode which means that there is no replication but only one central server. A so called hub-and-spoke configuration.

In this OSGi container there are three implementations of the QuoteService interface which is located in the other project you have just downloaded: org.eclipse.ecf.services.quotes. Each implementation resides in a separate bundle and the bundles are started and stopped one by one. Starting a bundle causes the Zoodiscovery software to broadcast a publication message to its clients.

Eclipse Twitter
Press the connect button on your user interface and your client will connect the the Zoodiscovery instance running on yazafatutu.com. After a few seconds, your OSGilloscope will come to live and quotes are shown every time a new bundle is started on the server. One of the three implementations of the QuoteService runs an Eclipse Twitter quote service. If you are on twitter then your quote could be there as well!


The Info tab
The Info tab shows some information about the discovered server. Take a look at the "component id" property because that conveniently counts the number of times a service was published. You can see from its count that the ECF Discovery service can handle a few publications. It needs about 25 weeks to hit a cool million. At the time of this writing it has run about 4 days.

How does it work
It is very easy once you know how. The application itself is a cross between a standalone Java application and an RCP, which is an interesting concept in itself. When the product is started, the Application class is given control. In the start method, the UI is setup and then a listener is installed to listen for service publications. This code is very easy to follow. For every service that comes in, it is checked to be a QuoteService. If this is the case then the UI is updated. The ECF remote services takes care of the remoting and your service is published as if it was a local service.

Please remember to place your code in a try block: You are working with remote services. If the remote server shuts down or decides to stop the service, the communication framework will throw an Exception. You always have to be aware of the fact that OSGi services are dynamic and remote services even more. Code in a defensive way suitable for network programming.

How is the framework started
Please look at the Configuration tab of the product configuration. A few of bundles are started to make sure that the underlying framework is initialized. The connect button of the UI does the manual work by creating a Container which is the ECF concept for an endpoint.
try {
zooContainer.connect(
zooContainer.getConnectNamespace().createInstance(
new String[] { "zoodiscovery.flavor.centralized="
+ getServers().getText() }), null);
Clients most of the time run in centralized mode and point to a server with configuration information and so does our client. We can remove the manual connect by setting the following Java options:

-Dzoodiscovery.autoStart=true
-Dzoodiscovery.flavor=zoodiscovery.flavor.centralized=yazafatutu.com

Conclusion
This is a small example on how to use the ECF Zoodiscovery from a consumer perspective. Various parts of Zookeeper can be configured to achieve an optimum for your specific needs and network. More information can be found on the Eclipse wiki about the configuration of Zoodiscovery.

Many thanks to the developers of OSGi, Equinox, Zookeeper and ECF for enabling us to glue this together to this very useful piece of software.

Need Help?
We can help you with professional services and training to implement this and other parts of Eclipse. Please drop a line to sales@industrial-tsi.com for more information.

Links


woensdag 31 maart 2010

ECF Discovery: How many Zookeepers does it take to screw in a lightbulb?

image:zookeeperecf.gif
If you use OSGi remote services (See OSGi Compendium Specs chapter 13) you have to know the other end. In large installations this configuration can be quite cumbersome.

At Remain Software we develop software to manage nodes in a network. We want our nodes to register themselves to us when they are in the network. This is fine if you manage a small office but not if you manage smart lightbulbs in a sky scraper.

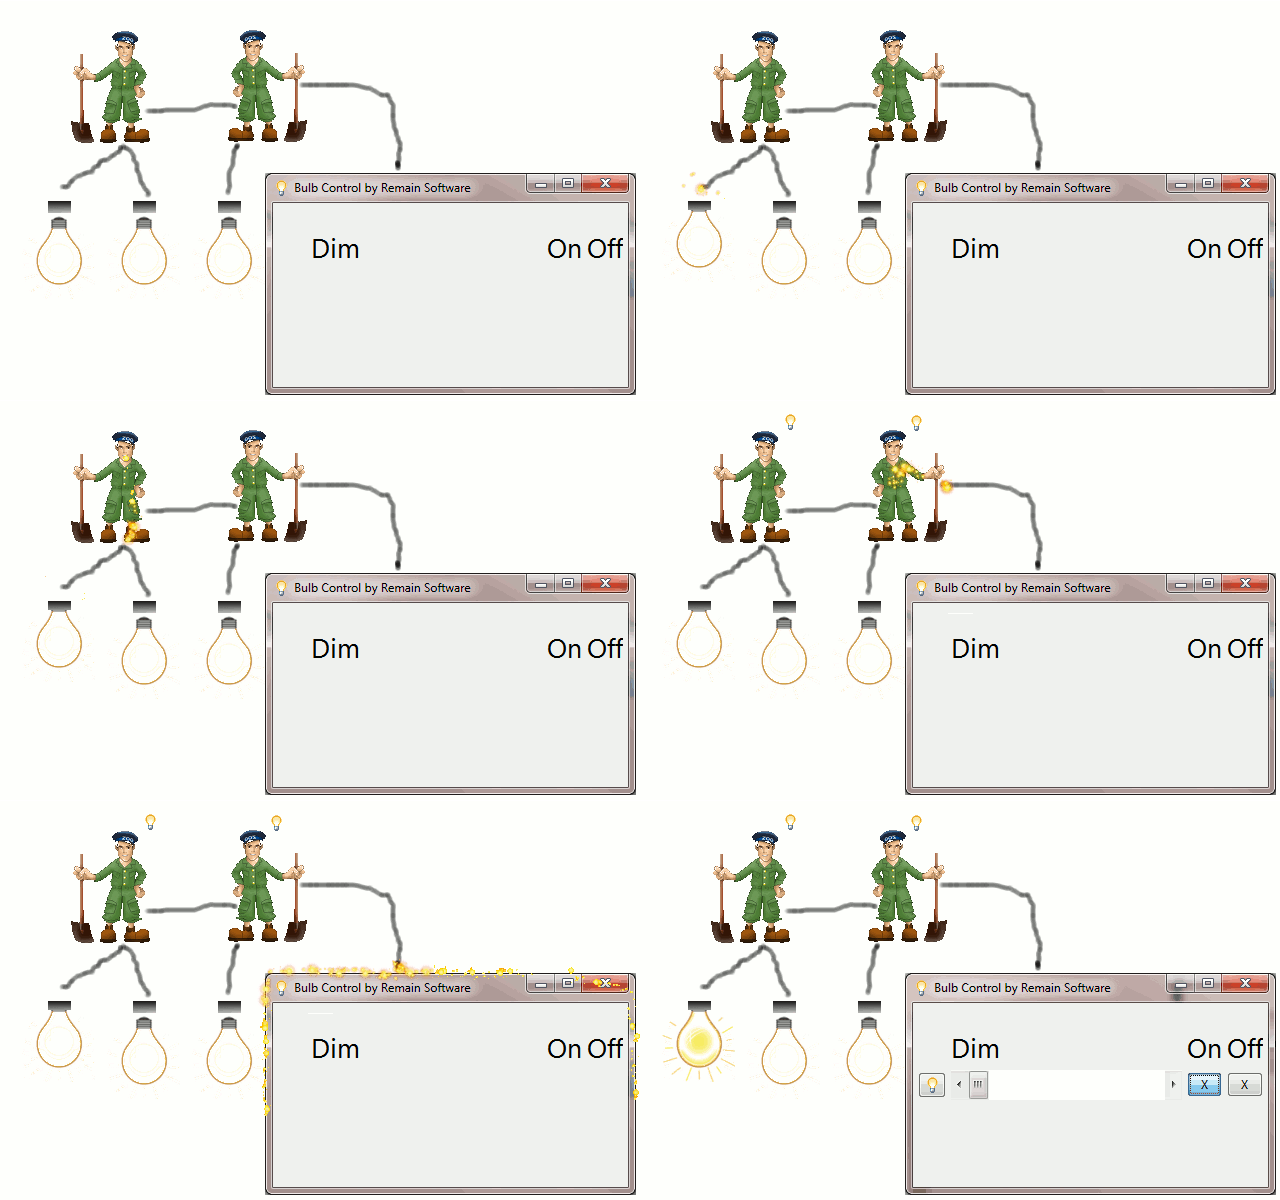
As soon as the lightbulb is screwed into its socket, it can tap some power to activate its OSGi runtime. The runtime will activate the ILightBulb interface with methods dim(int), on() and off() as a remote service. Now, how do we get this service to interested parties...

ECF For the Win
The ECF discovery framework enabled us to create a Zookeeper based Discovery implementation. An addition to the already existing JmDNS (Zeroconf/Bonjour) and jSLP implementations.

An Apache Zookeeper server will replicate configuration data between other Zookeeper servers. The Zookeeper servers know each other and clients know one Zookeeper Server. So the smart bulb (which runs OSGi or did I mention that already?) is preconfigured with the address of its nearest Zookeeper server or gets this information dynamically by some kind of IP broadcast.

image:zookeeperecf.gif

When the lightbulb publishes its Remote Service, ECF wakes up and publishes this service through the provided Discovery implementations. The Zookeeper discovery provider will immediately notify its nearest peers and the new lightbulb service is registered in all Zookeeper instances. When the Zookeeper instance that is connected to an interested party receives the data, the Discovery implementation will publish this service in that OSGi container.

The Lightbulb Control Center is waiting for the ILightBulb service and magically creates a UI in its console (the sparkles DO NOT appear in reality. I made that up).

The Building Maintainer can now control the lightbulb.


More..
For more information or if you want to Tinker with the code, please visit the wiki.

Acknowledgements
Ahmed Aadel, one of the great developers working at Remain Software created the Zookeeper Discovery Implementation. Thanks to Scott Lewis and Markus Kuppe from our ECF team for support and Chris Aniszczyk for easy access to Tinkerbell (tm)

Animations done with the Gimp.

woensdag 19 augustus 2009

Running Equinox OSGi and ECF on the System i - Part 2

In the previous installment of this series I have demonstrated what it takes to run OSGi on the AS/400 (or System i as it is called today.)

Goal
In this part we take the OSGi installation one step further by adding additional bundles to the initial installation. A bundle is OSGi slang for a group of Java classes that together perform certain tasks. They are also called modules or plug-ins (because of their plug and play nature).

Remote Services
As I mentioned earlier, our company is in the process of creating a multiplatform SCM for which we need a Multiplatform Communication Layer. Multiplatform can be mapped to Java and Communication Layer translates to the Eclipse Communication Framework, ECF. Since we have already decided to use the OSGi technology as the runtime container, we were also looking for a OSGi defined solution. As you might know, OSGi only provides specifications. It is up to others, like the people from Eclipse and Apache, to write an implementation. One of the new specifications in the upcoming OSGi release is referred to as RFC 119. It describes how an OSGi service should be addressed remotely.

Remote Services is important to us because we have to sometimes manage several hunderds end-nodes. Beeing able to do so in standard OSGi makes us free from the choice of using one specific remoting solution. The RFC 119 technology enables us to choose from different implementations and we have tried both the Apache and the Eclipse implementation.

Cleanup the OSGi installation
If you have followed the previous article, you will notice that there are a lot of bundles in the plugins directory. For our current purpose we don't need all of them and we also want to be as clean as possible. So we are going to move all the unused bundles to a special directory called "Equinox Bundles" we can get to this directory if we need another bundle later. Create a directory with the name "Equinox Bundles" in the /QOpenSys/Equinox directory and move all the bundles in the "plugins" directory into this directory. Now copy back the three jars from the "Equinox Bundles" directory that start with:
  • org.eclipse.equinox.common
  • org.eclipse.osgi
  • org.eclipse.update.configurator
and are followed by a version number and a build identifier.

Setup the configuration.ini
OSGi is configured using the config.ini file in the installation directories 'configuration' directory. OSGi already created this directory for you after the first launch. If it is not there, please see the first article and run the framework.

Now we are going to create the config.ini file with the following content:

osgi.bundles=org.eclipse.equinox.common@2:start, org.eclipse.update.configurator@3:start
eclipse.ignoreApp=true
osgi.install.area=file:/Qopensys/Equinox/plugins/
osgi.console=667
osgi.noShutdown=true

Line 1 instructs the OSGi framework to first start the common bundle and then the configurator bundle. The configurator bundel will automaticall
y install all plugins that are located in the plugins directory of the install directory. In the next step we will put all of our non-framework bundles in that directory.

Line 4 will listen at the TCP/IP port 667 with a telnet server. You can use putty or any other client to telnet to port 667 of this machine. It will give you the console and enables you to run the OSGi framework in a batch job and still be able to control it. Mind you that many OSGi installations happily run without a console or are controlled through other means (e.g. a controlling bundle).

Running as a Batch job
To run the OSGi framework as a batch job start the following command (adapted to the id of your download)

SBMJOB CMD(JAVA CLASS('/QOpenSys/Equinox/plugins/org.eclipse.osgi_3.5.0.v20090520.jar')) JOB(OSGI)

Now fire up your favourite telnet client and try to access port 667. Keep in mind that you can only connect one session at a time.

Now type the "ss" command to show that the framework is running and indeed all our bundles are active.


The exit command will stop the framework and exit. The disconnect command will terminate the telnet session but will leave the framework running.


Setup ECF
Since we are Eclipse junkies we setup our distribution server with the ECF software from Eclipse. So download the ECF SDK. If this link is broken then just go to the Eclipse site and navigate to the ECF SDK and get the zip. Then drop all the bundles from this zip into the '/QOpenSys/Equinox/plugins/plugins' directory. That is correct, two plugins directories.

The reason for this is the org.eclipse.osgi.configurator bundle. It will install all bundles that are found in the plugins directory for us so we don't have to do that ourselves. Since we have installed OSGi in the /QOpenSys/Equinox/plugins directory, we have two directories with this name.


Now stop the framework and submit the job again. Telnet to port 667 and try the "ss" command. This time you will see a lot more. You can filter the list to show only the active bundles by using "ss -s active"

The Next Time
The next time we will create two plugins. One will consume the remote service that the other will provide.

Thank you for your feedback