donderdag 1 maart 2018

The new Bling. Part 1: Nebula and Opal

Recent studies [1] seem to suggest that companies are becoming tired of building web applications in favor of the rich client. Good news for the newly weds: Nebula and Opal!


You might know Nebula, which provides of a number of beautiful and functional widgets to spice up your RCP applications. You might not know Opal. Opal has been roaming freely on the internet and has been programmed largely by Laurent Caron.

I have been chasing Laurent to join the Nebula project since 2014 and after some hard work over the last couple of months we finally did it:


"two dozen new widgets have moved to Eclipse."

A great time to remove my blog from the mothballs (a Dutch saying, but you get the idea) and put some of Nebula's new widgets in the spotlight.

The new Bling. Part 1. The CheckboxGroup

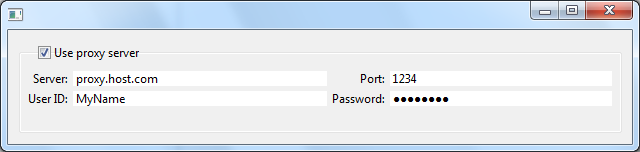
Laurent, this is such a great idea! There are many times when you want to enable a group of  widgets based on an initial selection. The whole boilerplate code of such a pattern in standard SWT is ugly as mud. Check this code and tell me if you recognize it:

    proxyBox.addSelectionListener( event -> { 
       server.setEnabled(proxyBox.getSelection();
       port.setEnabled(proxyBox.getSelection());
       user.setEnabled(proxyBox.getSelection());
       password.setEnabled(proxyBox.getSelection());
    });
 

Enter the CheckboxGroup. On:


and off:


From Laurent's wiki documentation:

You can set/get the text and the font of the checkbox, and you get the value of the selection by calling isActivated(). In case you want to set the state of this checkbox programmatically (and thus enable or disable the content of the group) you use activate() and deactivate().

The content, which is a Composite, is accessible with the getter getContent().

Pretty slick! And this is only one of the 24 new widgets!  You can get the CheckboxGroup from the latest nighly builds.

Cheers,

Wim


[1] fake news


donderdag 17 maart 2016

IoT: Upcoming V3 release of the Arduino Eclipse plugin


If you are an Eclipse and Arduino fan you should definitively try this project. On April 1 V3 will be released but stable downloads are already available from the nightly section.

"With the release of version 3 of the Eclipse Arduino product, nicknamed "Toddler", Project Lead Jan Baeyens brings us the next big step in professional development for the open hardware Arduino platform. The major features of this release are single install,  auto library include and an incredibly good integrated serial monitor."

Stable nightly downloads are here [1]
Source code is here [2] 


[1] http://eclipse.baeyens.it/
[2] https://github.com/jantje/arduino-eclipse-plugin

Cheers,

Wim

woensdag 8 juli 2015

Unix Time to Date conversion in SQL for DB2 DB2/400 or iSeries or IBM i

For those of you who are in search of converting a UNIX Epoch Timestamp or whatever this is called to a readable date in DB2/400 SQL may have found this posting here [1]. However, this does not translate to the beloved IBM i SQL syntax so I converted it to something that will run on the IBM i.

The Function


CREATE FUNCTION e2d (ept INT)                      
RETURNS CHAR(23)                                    
RETURN                                              
(CHAR(DATE(INT(ept/86400) + DAYS('1970-01-01')), ISO))
|| ' ' ||                                           
repeat('0', 2 - length(rtrim(mod(int(ept/3600), 24))))
            || rtrim(mod(int(ept/3600), 24))        
|| ':' ||                                           
repeat('0', 2 - length(rtrim(mod(int(ept/60), 60))))
            || rtrim(mod(int(ept/60), 60))          
|| ':' ||                                           
repeat('0', 2 - length(rtrim(mod(int(ept), 60))))   
            || rtrim(mod(int(ept), 60))             
|| ' UTC'                                            

How to use

The timestamps can be included with milliseconds which this function does not accept so you either change the function (or let me do it for $100) or strip the milliseconds from the value.


Value in File

> select expected_start_date from item
Result:
      EXPECTED_START_DATE   
        1.368.965.867.668   
        1.369.138.667.695   
        1.369.138.667.658   
        1.423.064.635.396   
        1.356.951.946.378   
        1.369.052.267.674   
        1.358.246.021.420   
        1.370.953.067.703   
        1.369.052.267.689   
        1.369.052.267.671   
        1.413.212.245.996   
        1.366.979.412.834   

Value in File with Conversion

> select e2d(int(expected_start_date/1000)) as expected_start_date from item
Result:
EXPECTED_START_DATE   
2013-05-19 12:17:47 UTC
2013-05-21 12:17:47 UTC
2015-02-04 15:43:55 UTC
2012-12-31 11:05:46 UTC
2013-05-20 12:17:47 UTC
2013-01-15 10:33:41 UTC
2013-06-11 12:17:47 UTC
2013-05-20 12:17:47 UTC
2014-10-13 14:57:25 UTC
2013-04-26 12:30:12 UTC
2013-02-04 16:15:57 UTC
2013-02-03 23:27:41 UTC
Cheers,

Wim
wim.jongman at remainsoftware com

[1] http://www.walkernews.net/2014/02/08/db2-sql-function-that-converts-unix-epoch-time-to-calendar-date/

zondag 13 april 2014

How to contribute to Nebula with Gerrit

How to contribute to Nebula with Gerrit

This video shows how contributors can clone our git repo and supply patches through Gerrit.


woensdag 26 maart 2014

Nebula Newsletter Q1-2014 / Calling New Contributors

Here is a little summary of the work that has been going on in the Nebula Project over the past half year or so.


New Committers
Three new committers joined in 2013, Dirk Fauth for Gantt, Xihui Chen for Visualization and Cedric Brun for Paperclips. A number of patches have already been accepted and Xihui is having a lot of fun accepting multiple large patches for the same code!


We have two new committers joining the ranks. Just recently Laurent Caron joined after I invited him to get the Opal widgets from EclipseLabs into Eclipse. The code has been accepted by our legal department and after the committer paperwork is done I will help Laurent to get his widgets into our repo and build system.

We are currently running a committer vote for Mirko Paturzo. Mirko brings a lot of new energy to the Grid widget. Mirko has finished a really nice contribution to the Grid widget. Speed and memory consumption have been dramatically improved and currently Mirko is attacking the open bugs list for Grid.


Gerrit and other cool releng stuff 
Thanks to Mickael Istria we are running the smoothest Gerrit workflow. Our system is now routinely being tested after every contribution to Gerrit. Accepting patches has never been so easy.

Apart from Gerrit, Mickael has also setup a Sonar instance for Nebula. It gives you information about your code in the areas of Duplications, Coding standards, Lack of coverage, Potential bugs, Complexity, Documentation and Design. Please check it out. This brings me to:

Unit Tests
Please provide Unit tests for your widgets people!

EclipseCon Europe Nebula Talk 
I have conducted a talk about the Nebula project and introduced a lot of our widgets. I did not create a Powerpoint or Prezi presentation but instead I used that other presentation tool: RCP and Nebula widgets. You can check out the sources here: https://github.com/EclipseNebula/ECE2013. By the way, the presentation was voted #8 best talk based on number of people attending and rates given. 


Project Lead
In January, Tom Schindl resigned as co-lead. I want to thank Tom for all his work in the Nebula community over the past years. I wish him the best of luck with his current endeavors which are mostly focussed on Eclipse/JavaFX integration. Tom will maintain his Nebula committer status.
I will be soliciting for a new co-lead in the near future. So please ask yourself if this is something that you want to do.

Future of Nebula
Spring has come. In a few days I will launch a discussion about the future of Nebula. Please start thinking about the things you do not like in the project so that we can discuss and change them.


Calling New Contributors
Nebula is the easiest project in Eclipse to get involved in. We have the clearest repo structure, we have the best contributor guide, we have the least dependencies, every change you make can be build locally, we have the coolest Maven/Tycho/Hudson/Sonar build system, an advanced git/Gerrit workflow and the most welcoming and friendly project lead (me ;). We will guide your first steps into the magical realm of Eclipse and Open Source development. If you are an Eclipse newcomer and you want to hone your open source contribution skills then Eclipse Nebula is the place to start. Please reply here, contact me privately or send a mail to the nebula-dev list if you are interested.


This is all I could think of for now. If I have forgotten something, please respond here, to the nebula-dev list or in a private mail to me and I will make it right.
Happy coding,

Wim Jongman


donderdag 20 februari 2014

How to add your Hackergotchi to Planet Eclipse

I write this blog to test if my Hackergotchi appears on Planet Eclipse. Normally you ask the webmasters to insert your Hackergotchi into the relevant files but now that we have Gerrit, the only thing the webmasters need to do is to check the code and accept your patch.

This is how I added my own Hackergotchi to Planet Eclipse.


File a Bug
First I filed a bug against Community/PlanetEclipse.org. You do this by clicking on this link[1]. You also have to sign the CLA. You can do that from bugzilla.


Write down the bug number and the summary

Get your Gerrit password
Then you need to get your Gerrit password. You do this by clicking on this link[2] and sign on with your bugzilla e-mail address and password. After you have done this, a screen appears where you see your Gerrit credentials. Write them down.


Clone the git repository 
Go to the command line and surf to the place where you keep your git repos and type

git clone https://GERRIT_USER_HERE@git.eclipse.org/r/planeteclipse.org/planeteclipse.org

Then go into Eclipse, open the "Git Repository Exploring" perspective, click "Add an existing local git repository to this view" and pick the planet eclipse repository that you have just cloned.


Then import the "planet" project:

Changing the content 
Create a Hackergotchi. Mine is about 90x120 and you should also be in this range. Be creative. Make sure you have a transparent background. Once your Hackergotchi is created, open the package explorer and find the "planet" project. Then open the "output/images" directory and place your Hackergotchi in the "faces" directory. 

Then open the "eclipse/feeds/community.ini" file (open in text editor) and find the link to your blog. Then just below the entry, make sure to put the following content just below your blog entry. 

[http://industrial-tsi-wim.blogspot.com/feeds/posts/default/-/Eclipse]
name = Wim Jongman
face = wim.png
facewidth = 96
faceheight = 122

Your name should already be there and the "facewidth" and "faceheight" variables should exactly match the image dimensions. The "face" variable should exactly match the name of the image you placed in "output/images/faces".

Commit your changes 
Committing your changes to Gerrit requires some additional steps. First write down the bug number in the format I show here:

bug xxxxxx - bug summary


(click 1)
(click 2)

Click on the project and select "Team/Commit ...". You have to add a Gerrit change-id and you have to sign-off the change. Then press "Commit"

Push to Gerrit
Again go to the "Git Repository Exploring" perspective and right click on the planeteclipse.org repo. Then select "Push to Gerrit ...":


On the dialog that appears type "master" in the field that follows "refs/for" in "Gerrit Branch". Then in the Login dialog box you type in your Gerrit password.


When EGit congratulates you with the push, you will see a link that looks something like this:


You should also be able to find it in Gerrit under "My/Changes"

Go to the bug again and enter this link in a new comment.

Happy Hackergotchi,

Wim

zondag 19 januari 2014

MDialog and MWizardDialog supported by the E4 Model Editor

We have added support for the new E4 model elements. We ask you to play with this and help us figure out what additional API these parts need.

To install the new E4 tooling you need to be on Luna M4 which can be found here (by the time of this writing).

Then you need to install the latest integration build of the model tooling which can be found here.

After installation and restart you can play with the live model editor to see these new elements in action.